Combined Rice Milling Machine,Mini Rice Mill Machine,Portable Rice Milling Machine,Automatic Rice Mill Machine HUNAN JINSONG MACHINERY CO., LTD , https://www.sheller.nl
Security monitoring system lens selection
1. Lens Focal Length: When considering the lens index, the designer needs to comprehensively consider the location of the monitoring target, the distance, the CCD specification, and the image quality of the monitoring target on the monitor, so as to select the lens with the most suitable focal length. . For example, production line monitoring generally requires the monitoring of relatively close objects, and it requires high definition. In this case, the fixed focus lens is generally better than the zoom, so the short focal length fixed lens is usually selected. Such as 2.8mm, 4mm, 6mm, 8mm and so on.
Another example is when monitoring indoor targets, the selected focal length will not be too large, generally will choose short focal length manual zoom lens, such as 3.0-8.2mm, 2.7-12.5mm; road monitoring, multi-lane monitoring to use a shorter focal length , Such as 6-15mm; crossroads of the traffic light license plate monitoring to use a correspondingly longer focal length, such as 6-60mm; city security monitoring generally use a focal length longer power zoom lens, such as 6-60mm, 8-80mm , 7.5-120mm, etc.; highways, railways, rivers, environmental testing, forest fire prevention, airports, borders and sea defense, etc., generally need to use a variable focal length power zoom lens, such as 10-220mm, 13-280mm, 10- 330mm, 15-500mm and 10-1100mm.
2. Field of view angle range: There is a formula for the calculation of the field of view angle range. Knowing the focal length of the lens, the size of the CCD, and the angle of view can be calculated. The lens has such a rule: the larger the focal length, the farther the monitoring is, the smaller the angle of view is; the smaller the focal length, the closer the monitoring distance, the larger the angle of view, and the inverse relationship between the focal length and the angle of view. For example, in some projects with manual zoom lenses, the field of view angle range is the first to be considered, so the selected focal length range is generally determined based on the angle of view field. The power zoom lens can control the zoom and focus by the keyboard at any time according to the scene environment, so the angle of field of view is not too much to consider. However, when the starting focal length of the power zoom lens is too large (for example, the initial focal length exceeds 20 mm), a wide range of monitoring cannot be achieved. 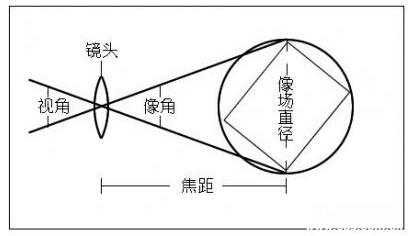
3. The aperture of the lens: The amount of light passing through the lens is measured by the ratio of the focal length of the lens to the clear aperture (F=f/D), denoted by F. Each lens is marked with its maximum F-number, the smaller the F-number, the larger the aperture. For constant lighting conditions, fixed aperture lens can be used, this is generally a laboratory environment; for the environment where the illumination intensity does not change significantly, the manual iris lens is often used, that is, the aperture is adjusted to an ideal value and then fixed. If the illuminance changes greatly, 24-hour all-weather outdoor monitoring is required. The auto iris lens should be used.
The application location of the monitoring lens fixed aperture lens: fixed focus and fixed aperture, mainly used for ambient light fixed place;
Manual iris lens: fixed focus but adjustable aperture, mainly used for fixed ambient light but indefinite place;
Auto iris lens: fixed focal length, using a DC voltage to drive a fixed-range location for ambient light variability;
Auto-iris lens: fixed focal length, using a video signal to drive a fixed-range location for ambient light variability;
Manual iris zoom lens: It is mainly used in indoor environment where the degree of light is variable and the range is not the same;
Automatic aperture zoom lens: It is mainly used in outdoor environment where the ambient light level is variable and the range is not the same;
On-Board Lens (on-Board): mainly with infrared cameras, both indoor and outdoor;
Fish-eye panoramic lens: It is mainly used in indoor environment where the degree of light is indefinite and the size of the range is specific;
Electric zoom lens: It can remotely control the depth of focus and aperture of the focal length. It is mainly used in places where the indoor and outdoor ambient light levels are uncertain and the depth of field range can be adjusted according to requirements.
Pin-Hole: Mainly used for concealed monitoring and ambient light with a range of specific places.
Test step 1. Sharpness When using multiple cameras to test, the same lens should be used (it is recommended to use fixed focus and two variable lenses). The center circle of the test card appears on the right and left sides of the monitor screen. Clear and accurate. The number of ticks given has a total of 10 sets of vertical lines and 10 sets of horizontal lines. Represents vertical resolution and horizontal resolution, respectively, and the corresponding set has given the number of lines. For example, the vertical 350 line level 800 line, at this time it is best to use a black and white monitor. The test can focus on distant objects or focus on the edge. It is best to use both, and you can see the differences in this camera (for far and near convergence). 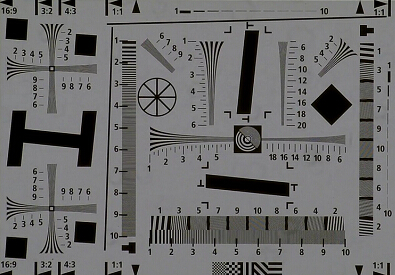
2. Color reproducibility test This parameter should be selected color monitor. First observe the characters and costumes from a distance to see whether there is color distortion or not. Compare the objects with vivid colors. Look at the sensitivity of the camera. Take the color picture book in front of the camera. Look at the picture clearly, too light or too thick, and respond to the motion again. The color objects are photographed for color smearing, lag, blur, etc. The test conditions such that the maximum illuminance of the camera at 50V should be measured under the condition of 50+10V illuminance, that is, 10V on the basis of the most illuminance of each camera, and the aperture should maintain the closest state.
3. Illumination The camera is placed in a dark room. Before and after the dark room, there is an active 220V self-firing lamp. A voltage regulator is provided at the place where the voltage regulator adjusts the voltage generation to adjust the darkness of the dark room lamp. The voltage can be adjusted from 0V to 250V. The indoor illumination can also be adjusted from the darkest to the brightest. When the camera's aperture is open to the maximum, the next lowest illuminance value is recorded during the test (the active light regulator is dimmed to a position that cannot be seen in the dark interior). Hit the minimum and then record the next minimum illuminance value.
4. Backlight compensation test There are two methods for this parameter: one is in the dark room, turn the front of the camera to adjust the light to the brightest, and then place a picture or text under the lamp, the camera welcome the camera To see if the image and text can be seen, the picture is not dazzling, and adjust the AL, AX pullout switch to see if there is a change, which effect is best. The other is to take the camera out of the window when the sun is shining. At this time, you can see if the image and text are clear.
5. Ball Distortion Look at ball distortion Place the test card at the front of the camera so that the entire sphere appears on the screen. See if the sphere has an ellipse. Move the camera forward to see if the center of the circle is magnified. Then test the edges and angles at a long distance. , whether the box has arc distortion.
6. The minimum operating voltage for power consumption, use a multimeter to measure the current, and use a small voltage regulator to adjust the voltage.
The high performance of the lens common fault processing monitoring system depends on the perfect match between the camera and the lens. In the monitoring project, if the user or construction staff lack of expertise, the camera and lens selection and installation are unreasonable, it will directly affect the The overall effect of the system. Summarized several common but easily overlooked issues during lens installation for your reference.
1. The camera and the lens imaging size does not match The lens imaging size is larger than the camera chip size, can normal imaging, but the lens field of view angle will be less than the nominal angle of view; but if the lens imaging size is smaller than the camera chip size, the monitor screen will be around There is a dark corner.
2. The mismatch between the camera and the lens interface does not match the distance between the second set of points of the lens and the camera chip, and the actual focal length is not the nominal focal length of the lens, resulting in the inability to focus. The standard gun camera interface and lens interface should be the same as the C interface or the CS interface; the C interface lens must be attached to the CS interface camera must be added adapter ring; CS interface lens can not be installed on the C interface camera. The common gun type camera interface is usually designed as a CS interface, and it can be connected to a CS interface lens or an adapter ring to connect a C interface lens.
3. Camera and lens aperture work drive method or voltage mismatch Automatic iris lens is usually divided into DC drive and video drive, the two operating voltage is not exactly the same, this mismatch will cause the lens aperture can not be opened normally, naturally it will not be able to Imaging. AVENIRETOKU Seiko engineers remind everyone that when using the auto iris lens, the aperture converter on the camera should be driven to the nominal drive side of the lens, and the output voltage of the camera should be within the working voltage of the aperture.
4. Connection problems, misconnections, or loose connections The monitoring camera, the lens, and the monitor will have various connections (if the device is connected with a pan/tilt head and a controller), these connections will be connected incorrectly or loosely. , It will also cause the system to not work properly. We also remind everyone to carefully read the instruction manual of the equipment before installation.
Monitoring lens selection and troubleshooting
The lens is the camera's eye, and its performance is directly related to whether the camera imaging picture is clear. Therefore, if you want to maximize the efficiency of the camera, in addition to the camera itself excellent camera components and circuit design, but also need to choose a suitable lens.